Monday, December 10, 2012

Super Storm Sandy and the Red Cross

I've mostly ignored my blog for quite a while.  Life has a way of getting in the way of the best laid plans.

  My fall plans shifted just a bit when on November 16th I deployed with the Red Cross for Disaster Relief to victims of Hurricane Sandy.

Tuesday, October 23, 2012

Free-Form Machine Applique, the Master Pattern

Line drawing, and a photo of the finished 36"x28" quilt
I taught a class this past weekend on how to do the sort of turned-edge, free-form work that I do.  I realize I didn't do a good job explaining the importance of making a good pattern, AND the extreme importance of using freezer paper and nylon netting for a stablizer in the construction process to keep everything true.

I've made a quilts that were "air layered," that is, each piece was sewn to the next piece with NO backing.  What WAS I thinking?!! I fought with those quilts at every step of the way, they skewed to the right, and to the left.  One side usually ended up longer than the other, they stretched and bagged...in the end they worked, but whew...they drove me crazy.

I've made machine appliqued quilts with a variety of other backings--muslin, iron-on-tear-off Totally Stable Solvy, light-weight Pellon, and French fuse.  All of which were more difficult to work with than my current combination of netting and freezer paper.  I did not explaining this process to the participants in my class well enough.  I don't think they became true believers, and consequently I think they may have more trouble making their quilts than they need to.   So, I'm going to write more about making the pattern and then the construction process--my penance,  I guess.   Here's the first, and really, most important part...making the pattern.

Choose an image for your pictorial quilt

I've talked about copyright issues before, and choosing images with a strong focal point, and lots of value changes.  Those are important, so take a look at those past posts.  I've also talked about how to go from a photo to a line drawing that can be enlarged to the actual pattern size.

Now add to that:
Master pattern on left, marked with arrows and dashes.
  • The enlarged line drawing IS the master pattern--or will be.  Hang it on the wall and study it.  
  • Enlargements sometimes have problems that do not show up in the smaller format--things like leaning buildings, odd shaped foliage, big blank areas.  These things can be corrected on the master pattern with some White-Out and a dark pencil, or even a little cut-and-paste.
When you are pleased with the enlargement:
  • Think about where you will begin.  The middle and work out?  An upper corner?  Generally, I start with the background and work from the top down, but I know quilters who begin with the focal point, the bottom, the middle.  You have to decide.
  • Mark your master pattern...which pieces are going to tuck under, which ones will have a clean, turned edge?  Use a pencil to begin the marking.  This takes time, and you will erase a lot, especially at first.  Don't get discouraged, this somewhat laborious process will make everything go smoother later on.
  • I should say that all my marks are made with permanent, fine-point Sharpies--they don't bleed when they get wet, and they make a nice, dark line.
  • I use either arrows, or a green line, to indicate the edge I want to turn under, and dashed lines to indicate the edge that will remain raw, and slip under the neighboring piece.  The solid line is the cutting line for the PAPER pieces.  NO SEAM ALLOWANCE IS INCLUDED, that is added when templates are attached to the fabric. 
  • I often, though not always use colored pencils to color some or all of my master pattern with the basic color I think will work in one area or another of the quilt.
Don't rush this stage.  The more you think about the master pattern, the more problems you will solve.

As you look at the shapes in your pattern think about how easy/hard it will be to make each piece.  Any shape can be made, but some will be easier than others.

For example, in this cube pattern, piece # 5 has sharp corners.  If the top edge of piece number 6, and the adjoining edge of piece 1--both straight edges,  are turned under where they lay along piece #5, then no sharp point needs to be turned, The point on the left of piece #5 will be formed when #5 is tucked in place under #1 and #6. 

Working these things out in the paper stage really puts it all in your head so that later on, the cutting, and sewing is much easier.

OK.  Enough for now.   Spend time on the pattern, it'll pay off in the long run.

Saturday, September 29, 2012

LaConner Quilt Fest Award.

This quilt, Deep in December was accepted int the LaConner Quilt Fest during the summer.  I was pleased to have it accepted, of course, but today I was notified that my quilt is the winner of an award.  What award they would not say, as the specifics are going to be announced at a dinner on Thursday night.

I'm not going to the dinner, so I'll have to wait until the results are posted on the museum's website.  All will be revealed in due time, as they say.  Meanwhile, I'm pleased just to know I received an award of any kind.

Tuesday, September 18, 2012

How to Machine Applique on a Foundation

 The Cube Pattern

Why make this simple pattern?  By following the steps for making this small sample, you will learn all the essentials for making and using a pattern for turned edge, machine applique.  
  • Marking the pattern
  • Making a template
  • Pinning to a foundation
  • Turning curved and straight edges
  • Dealing with points
  • Stitching the pieces together
 Down load the photo of the pattern and in your photo editing software, enlarge the pattern as large so it will print as large as possible on an 8.5x 11 inch sheet of paper.  I use nylon netting for a foundation.  It is light-weight and thin, and it doesn't stretch much, so it makes an ideal foundation that can be left in.  

Things to note about the pattern:

  • The markings and what they mean—the edges with the green line will be turned under, and ironed.  The edges with the dotted lines will be left raw, and slipped under the turned edges.   The solid blue line is the cutting line, with NO SEAM ALLOWANCES included.
 
  • The image has two planes or layers.  Pieces 1-4 form the background, and pieces 5-9 form the foreground.  Most images you are likely to work with will also have a middle ground.  Generally, though there are always exceptions, the background is formed first, then the middle ground, and the finally foreground.  Often I make my background solid, even though middle and foreground elements will cover it.  That way I have the freedom to move elements around if I want to.

  • Construct elements in units.  Though it is not always possible, I try as much as possible to construct smaller units so they function as one piece.  For example, I think of  piece 5 & 6 as a unit because they form one side of the cube.  The left edges of both pieces are turned under.  I would cut out those two pieces, turn their appropriate edges and pin them together.  Then I would construct pieces 7 & 8, saving number 9 for the last, since units 5&6 and 7&8 tuck under number 9.   


  • Dealing With Sharp Points.   Piece #9 could be made by turning under all of it's edges, but then there would be two very sharp points to deal with...the point on the left and right hand sides of the shape.  By tucking the bottom edge of #9 under piece #5, and the right-hand side of piece 9 under the top edge of piece #7, it is unnecessary to deal with a very sharp points.  In a later post I'll describe how to handle sharp points if there is really no other option.

You can’t anticipate every issue as you plan your pattern, but generally if an adjoining pieces share a line, do those together.

HOW TO:
    1. If the pattern is LARGE, I work with sections at a time, rather than trying to make a freezer paper template for the entire pattern.
    2. Trace the pattern on to the papery, non-waxy side of the freezer paper.
    3. Cut a piece of nylon netting larger than the pattern, then lay the freezer paper, waxy side down, over the netting.  Iron the edges of the freezer paper to the netting, about 2 or 3 inches away from the actual pattern.
    4. Use paper scissors to cut out piece number one.
    5. Iron the piece to the right side of the fabric.
    6. Cut around the pattern piece leaving a quarter inch seam allowance on the edges that have a dotted line. 
    7. Leave a scant quarter inch allowance on the edges with the green line, as these will be turned under.
    8. Leave an inch seam allowance on the outside edge of the pattern.
    9. Spray some spray starch or spray sizing into a shallow container (cottage cheese lids work well) and paint the starch along the edge to be turned. Allow a few seconds for the starch to soak in.
    10. Turn the piece face down, so the freezer paper in against the ironing board, and you are looking at the back of the fabric.
    11. Using your finger or a stylus to pull the edge back until it is even with the paper edge, then press until the fabric is dry.
    12. If there is a deep curve inward, clip the edges to within a thread or two of the edge of the paper.  This will help the edge lay flat.  The starch glues the edge under.
    13. If there is a pleat or a stubborn place on the seam allowance, rewet with starch and do that section again.
    14. Return the piece with the freezer paper template to the freezer paper template attached to the netting.  Fit it in place like a puzzle piece.  Lift the edge of the freezer paper template, and pin the piece to the netting. 
    15. Pick an adjoining piece, and repeat the process.  Cut out the next piece, iron it to the right-side of the fabric.  Cut around the piece leaving a seam allowance.  Press under the green-lined edge, and return the piece to the template. 

A NOTE ABOUT PINNING and STITCHING
As you work, pin with several pins across the seam line.  Silk or Satin pins work well because they are short, and the heads are small, so they don’t get in the way as much as larger pins.

EVALUATE AND SEW
When a section is completed, and everything is pinned in place, critique the work.  Are there places where another bit of fabric, or fabric with greater contrast, or a different color might we effective.  Once you are satisfied, take the section to the sewing machine and stitch it using either invisible thread or matching thread.  A blind-hem stitch or small zig-zag works well.  If this is piece is going to adjoin others, do not sew right to the end of each seam, but stop about a half inch from the outer edges.


Monday, September 3, 2012

Keeping Records for Your Quilts

I wish I had started keeping records of my quilts early on, because more than once I've looked at one of my older quilts and wondered, "how did I do that?"  Or  "what batting is in this thing? Since I can't seem to remember anything longer than 15 minutes, I've found keeping a record of each quilt is useful for many reasons:
  • To be able to replicate a technique.
  • To remember what stitch length or thread I used in various places.
  • To remember what batting I used.
  • To track where the quilt has been shown, or who I gave it or sold it to.
  • To help me keep track of the brands of materials used, such as paints, fusibles, spray basting, threads, etc., with notes about what I liked/hated about the product.  Nothing irks me more than to use the same product I hated AGAIN, simply because I've forgotten which one was the offender.
  • To have information like quilt dimensions, and date finished at my fingertips when I'm filling out applications for quilt shows.
As I'm working on a quilt, I throw all sorts of things into a file folder.  This might include photos, the labels off materials I'm using or notes about what I might do differently next time, how various products work or react to heat or heavy stitching.  I include a samples of stitching with an explanation the stitch number, length and width.  Basically anything to do with the quilt that I might want to do again, or want to be sure NEVER to do again.

When I finish a quilt, I take a photo of it, glue the photo on the outside of the file folder, and label the folder with the quilt's name.   I also add a record sheet to the folder.  The record sheet has a place for the quilt's name, dimensions, date finished.  This information is really useful when filling out applications for quilt/art shows.  The record sheet has a table to record info about quilt shows with columns for date accepted/rejected, venue, shipping date, show dates, return date (the date the quilt is supposed to be returned to me) and a miscellaneous column where I record any prizes or accolades the quilt earned, or sales information.

When a quilt is accepted into a show, I keep a print out of the notification, all the information and receipts for shipping it in the folder.   I keep these records, even long after the quilt has been sold, though I don't really know why.  Do you keep records of your quilts?  If so, what do you keep?

Tuesday, August 28, 2012

Art Quilt Construction Methods

There are several ways to construct a representational image from fabric.  I've tried most of the ways I've heard of in an attempt to find what works for me.  Here are some of the basics, all of them begin with a full-sized outline that indicates the major elements of the quilt.  I think it is important to use construction methods that allow for in-progress editing of your design without having to rip out miles of stitches or (gasp) toss the quilt into the UFO pile.

Turned Edge Machine Applique'
This is the method I use most, because I'm rather fanatical about having no raw edges, even though I've seen amazing quilts made with raw edge applique.  In my next post I'll go though the basic steps for this process, using a simple pattern, and petticoat netting as the foundation.  My whale quilt is all turned edge, machine appliqued.  As pieces are constructed, they are pinned to the netting, and when I'm satisfied with the composition of an element or section of the quilt, I sew them to the backing along the edges of each piece using invisible thread, and a small zig-zag, or blanket stitch.


Raw Edge Applique' or Collage
When I did my sun quilt with raw edged applique, I used muslin as the backing, and a glue stick to temporarily hold things in place.  I liked the freedom of this method, and the ease of adding pieces.  Most of the fabric pieces are very small--2 inches across or less.  Tucking pieces under the edge of others, or over the edge of others offers the same kind of flexibility as painting.  When this piece was all glued down, and the glue dry, I took it to the sewing machine and using invisible thread on the top, and a neutral cotton or poly thread in the bobbin, free-motion stitched over the whole thing, trying to catch at least an edge of most pieces of fabric.  Then, because I am fanatical about raw edges, I used a glue stick and a little sliver of plastic like a palette knife to put tiny dabs of glue under an loose edges.

Raw Edge Fusing
  This is my least favorite method.  It's easy, and so popular.  I don't like the way the fabric feels when it's been fused, and there's not a lot of wiggle room.  Once you iron that piece on, it's there to stay.  The good part about fusing is it allows for some very intricate cutting.  The dancing figure in this little quilt would be tricky to do as a turned edge piece.  With fusible, it only took a few minutes to cut out.

 Steam-A-Seam II probably offers the greatest fusing flexibility, (There are probably other brands too) since it can be lightly pressed to the back of the quilt element, and then temporarily finger-pressed onto the background fabric.  This way the over-all design can be assessed before ironing everything in place for all-time.  Be warned though, even with light-weight fusibles like Misty-Fuse, if you build up the layers, you'll end up with plywood, and some places where it will be hard to pound a needle through the fabric for free-motion quilting.  On this quilt, where the dancer is fused over the moon, which is fused to the background, things are already getting pretty wooden. 

Combination of Techniques For Landscape Quilt
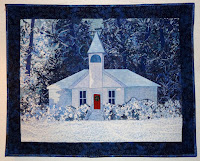
In reality, I probably use a combination of all the techniques listed above in most of my quilts.  In this quilt, for instance, the building is turned-edged, machine appliqued, except for some of the small detail like the simi-circle in the bell tower and the Christmas wreath on the door.  The trees, bushes and snow are raw-edge with white bridal tulle over them to hold it all in place, and give a little winter shimmer to the scene.


What is your favorite method of construction, and why?


Sunday, August 26, 2012

Choosing Fabrics for Landscape Quilts

Collection of small scraps sorted by colors
There is no wrong fabric for a landscape quilt if it serves your purpose, but generally choosing color-on-color cotton fabrics in a wide range of values gives you a very useful palette to work with.

 Large prints are problematic in a landscape quilt because they draw the eye to the elements in the print rather than blending into the overall composition.  Conversely, solid colors are generally too flat and end up looking like a paint by number picture.

Color on color prints, best for landscape quilt
I rarely buy anything other than fat quarters, and I save every little scrap of fabric left from previous projects.   I use these small pieces, collage style, to make elements for my quilts. 

For example, the section below is part of a river before it goes over a waterfall.  This section could be one solid piece of dark blue, but it would lack some of the dimension provided by the variety of fabrics.  I'm not happy with the part where the light blue triangle section near the top abruptly changes from a medium blue along a straight line.  I will either thread paint over the place where the two join, or use textile paint to try to blend them better, or, most likely, pull out at least one piece of the light blue fabric and insert another darker fabric.  All of these pieces are attached to a piece of nylon petticoat netting (not tulle).  So this piece is now like one solid piece of fabric, but it is not difficult to snip the threads between the pieces and insert another piece or two.

I'll explain this method of working with turned edged fabrics to create landscape elements a piece at a time in a later post.  


Friday, August 24, 2012

Quilting and Copyright Laws


Many landscape quilters work from photographs.  If these photos are your own...no problem.   You own the rights to them and are free to use them as you please. (99% of the time anyway.)

The problem comes when using images by other people.  If you make a piece closely resembling another person's artwork,  without permission, you are violating copyright law--even if you change the image in some way.  One of the more famous cases in recent years was the 2008 poster of Obama's image over the words HOPE.  The poster artist used a news photo of Obama without prior permission of the photographer, and was sued.  If you are just planning to hang the finished piece in your guest bathroom, it probably doesn't matter, but if there is any chance your piece will be exhibited publicly, get permission, or forget it.

If you find an image on, let's say Flickr Commons, and really want to make a quilt based on it, you need to write to the photographer and ask permission.  Most people are quite flattered that an artist wants to use their photo as a starting point for a piece, and readily give permission.  Be sure to keep the written permission with any papers related to the quilt.  If the quilt is entered into a show, you will be asked to declare that the work is original, or that you have permission to use the image.

There are many sources of copyright-free images that artists can use.  NOAA, for example, has a cache of copyright free images on their website.    Dover publishes books full of copyright free images.  (Susan Carlson's famous Pink Rhino is based on a Dover print.)  Even when using a copyright-free image, it is still good practice to acknowledge the source of the image.

You'll put a lot of work into your quilt, so try not to compromise it with copyright issues, but it's a bit of a mind field.  To see how complicated things can get, read this post on the C&T  Publishing blog.

Wednesday, August 22, 2012

Making a Pattern for Your Landscape Quilt

Page protector with traced image of the photo. 
There are a couple different ways to turn a photo or drawing into a large-sized landscape quilt pattern.  Both methods I use begin with turning the sketch or photo into a simple line drawing.

Make a Line Drawing of Your Photo
The easiest way to do this is to print your photo as an 8x11.5 print, and slip the print into a page protector.  The page protector keeps the print from shifting around while your trace the image onto the plastic with a permanent marking pen.   Trace just the major elements in the photo (or drawing.)  Remember you are tracing SHAPES, not just lines.  Each shape will end up being a piece of fabric.

Simplify by leaving out fussy little details, or unwanted elements such as parked cars or overhead electrical wires.  What you are going for here are the major components of the design.

I know some people have had success using a photo editing program to turn photos into line drawings, but I've never found this very satisfactory.

Turn Your Line Drawing into a Full-Sized Quilt Pattern
Once the line drawing is complete it will be used to make the full-sized  pattern for your quilt.  A couple of tried and true methods for making the pattern are:
  1. Go to Kinkos
  2. Use an Overhead Projector

Taking Your Line Drawing to a Photocopy Store
By slipping a piece of plain white paper into to the page protector behind your line drawing, you have a black and white image that can be photocoped.   FedEx Office (formerly Kinkos) can make large photocopies for about 80 cents a square foot.  Most shops have either a 36-inch wide printer which can make prints of any length, or a 48-inch printer.  Determine how large you want your quilt to be.  It is possible to break a design into several pieces, print the pieces, then tape them together.  This is a cheap, and easy way to go.   Take your image to the photocopy store on a thumb drive as a Kinko as a PDF attachment.
Using an Overhead Projector to Enlarge a Quilt Pattern
Since I live a long way from a photocopy shop, and I usual am anxious to get started on a new idea, I under the laborious method of using an overhead projector that I bought from Amazon for $60.  It has saved me both time (traveling to the photocopy shop from the island where I live) and money.  Even at 80-cents a square foot, photocopying can get spendy.

The other thing I like about using the overhead, is I am not limited by size.  Just by pulling the projector back, I can enlarge the image to just about any size I'd like.  I put my page-protector line drawing on the overhead, and tape butcher paper (which comes in 36 inch by 1000 foot rolls.  I'd like to buy a roll of butcher paper, but I usually buy it at an office supply store in increments of a 100 feet or so.)  Once the butcher paper is in place, I just turn the overhead projector on, and begin the laborious, but somehow satisfying task of tracing the image onto the butcher paper.

As I'm tracing, I become very familiar with the image, and start thinking of how I will handle various elements in the quilt, what quilting I might do, and how to solve some of the trickier parts of the composition.

When having the design photocopied, get two copies made if you can afford it.  If I blow up my design on with an overhead projector, I never make two copies, but always wish I had a second one that could be put aside as the master, while the other working pattern gets altered along the way with a little WhiteOut and some pencil lines.

NEXT:  A word about copyright

Articles you may be interested in:
Landscape Quilting How-to, The Materials
Choosing a Photo or Image to Make into a Quilt
Quilting and Copyright Laws

Tuesday, August 21, 2012

Choosing a Subject or Image To Make into a Quilt

Most landscape quilts begin as a photo or drawing. Whatever image you choose, there are some things to keep in mind:
  • Your image should have a strong focal point, but generally, the focal point shouldn't shouldn't be smack in the middle. Choose an image that has a background, middle ground and foreground because this is more interesting than a flat subject with no perspective.
  • If you do not have much drawing experience, it is best to choose a relatively simple subject for your first effort. Don't start by trying to do a portrait for example. Buildings can be a good choice since they are usually a collection of straight lines. Natural elements like foliage, mountains, rocks, seascapes, are also good choices because they are organic shapes--who's to say your rock or mountain is wrong??
  • Look for images with strong value changes. For example, pale tulips against dark tree trunks. Places where the lightest light is against the darkest dark are dramatic.
  • Look for an image that tells a story. A dog sitting on grass doesn't tell a story, but the same dog, sitting on the same grass looking up at a cat in a tree tells a story.
  • Your image should have elements that move the eye around the whole composition. Things like secondary focal points, value changes, and use of color can pull the eye around the composition.
In the end, the most important factor is that you really like the image, because you are going to be working on it for a long time.

NEXT:  How to enlarge a photo or   drawing to make a full-size pattern

You may also be interested in these postings:
Landscape Quilting How-to, the Materials you Need
Making a Pattern for your Landscape Quilt
Quilting and Copyright Laws 

Monday, August 20, 2012

Landscape Quilting How-to, The Materials

I live in a remote location, and have been very grateful to people who've generously shared their knowledge on-line.  Melissa Will, for example who shared years worth of her expertise for low-water immersion dyeing, and Leah Day who has put an encyclopedia of information about free-motion quilting on her blog.

I'm going to teach a class in October on how to design and make an original landscape quilt.  I've been thinking of just putting all the information for my class on-line, and since I've just started a new project, I think I can just work my way through my latest quilt project, and post what I'm doing, step-by-step.  If what I write doesn't make sense, email me, and I'll try to clarify the directions.  So, here's my first installment.

Materials I Use for Landscape Quilting:
  • Nylon netting.  (not tulle which is soft and gossamer, but petticoat netting.  The scratchy stuff that makes those square dancing skirts stand out from the dancers' legs like a beach umbrella.)  Get white.  It's not going to show, so color is only distracting.  This is cheap (About $1.39 a yard at Joannes.  Get 5 or more yards, it'll be the foundation for various elements in your quilt.)
  • Mono-poly clear threadSuperior Thread's is the best.  Because it is polyester, not nylon, it takes the heat of the iron without melting or getting brittle, and it doesn't become an instant rats nest when you sew.  I'm usually all about cheap and/or free, but this thread is worth the money.  (2200 yards for $8 on the Superior Website.)  This thread doesn't pass the Harry Potter test for invisibility, but it comes darn close.  The thread comes in clear and smoke.  Get clear, then later if you decide you mostly work on dark fabrics, you can spring for the smoke.
  • Freezer paper  DON'T buy the fancy pre-cut sizes sold in quilt shops.  Get the grocery store variety...you can tear off as large a sheet as you need, and because its reasonably priced you'll be less timid about using more if a pattern piece just isn't working and you need to make another.
  • A Page Protector.  Those 8x11.5 plastic envelopes with the binder holes already prepunched.  You'll use this to trace your photo.
  • Shapie Fine-Point Pen and a Shapie extra-fine point pens  Get them in black or dark blue
  • Spray Starch or Spray Sizing.  Get the cheap stuff.  Best Pressed is probably great, but 16 ounces costs nearly $9, while 22 ounces of Niagra Spray Starch in the pump bottle costs $2.30.   The cheap stuff works great, and I don't miss the lavender scent of Best Pressed.
  • A small, cheap, paint brush.  Probably a size 6 to size 8 works best.  A brush like the ones that come in a kiddie watercolor set is fine.  DO NOT buy some fancy (a.k.a expensive) paint brush at the art store.  Come to that, a Q-tip works fine too.
  • All the usual stuff--pins (LOTS of pins), needles, bobbin thread, paper scissors, fabric scissors, sewing machine, iron, and of course fabrics appropriate for the project you have in mind.  
Next: How to choose a subject.

Other Posts you may enjoy:
Choosing a Subject for your Landscape Quilt
Making a Pattern for your Landscape Quilt
Quilting and Copyright Laws