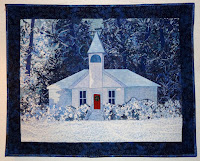
There are several ways to construct a representational image from fabric. I've tried most of the ways I've heard of in an attempt to find what works for me. Here are some of the basics, all of them begin with a full-sized outline that indicates the major elements of the quilt. I think it is important to use construction methods that allow for in-progress editing of your design without having to rip out miles of stitches or (gasp) toss the quilt into the UFO pile.
Turned Edge Machine Applique'
This is the method I use most, because I'm rather fanatical about having no raw edges, even though I've seen amazing quilts made with raw edge applique. In my next post I'll go though the basic steps for this process, using a simple pattern, and petticoat netting as the foundation. My whale quilt is all turned edge, machine appliqued. As pieces are constructed, they are pinned to the netting, and when I'm satisfied with the composition of an element or section of the quilt, I sew them to the backing along the edges of each piece using invisible thread, and a small zig-zag, or blanket stitch.
Raw Edge Applique' or Collage
When I did my sun quilt with raw edged applique, I used muslin as the backing, and a glue stick to temporarily hold things in place. I liked the freedom of this method, and the ease of adding pieces. Most of the fabric pieces are very small--2 inches across or less. Tucking pieces under the edge of others, or over the edge of others offers the same kind of flexibility as painting. When this piece was all glued down, and the glue dry, I took it to the sewing machine and using invisible thread on the top, and a neutral cotton or poly thread in the bobbin, free-motion stitched over the whole thing, trying to catch at least an edge of most pieces of fabric. Then, because I am fanatical about raw edges, I used a glue stick and a little sliver of plastic like a palette knife to put tiny dabs of glue under an loose edges.
Raw Edge Fusing
This is my least favorite method. It's easy, and so popular. I don't like the way the fabric feels when it's been fused, and there's not a lot of wiggle room. Once you iron that piece on, it's there to stay. The good part about fusing is it allows for some very intricate cutting. The dancing figure in this little quilt would be tricky to do as a turned edge piece. With fusible, it only took a few minutes to cut out.
Steam-A-Seam II probably offers the greatest fusing flexibility, (There are probably other brands too) since it can be lightly pressed to the back of the quilt element, and then temporarily finger-pressed onto the background fabric. This way the over-all design can be assessed before ironing everything in place for all-time. Be warned though, even with light-weight fusibles like Misty-Fuse, if you build up the layers, you'll end up with plywood, and some places where it will be hard to pound a needle through the fabric for free-motion quilting. On this quilt, where the dancer is fused over the moon, which is fused to the background, things are already getting pretty wooden.
Combination of Techniques For Landscape Quilt
In reality, I probably use a combination of all the techniques listed above in most of my quilts. In this quilt, for instance, the building is turned-edged, machine appliqued, except for some of the small detail like the simi-circle in the bell tower and the Christmas wreath on the door. The trees, bushes and snow are raw-edge with white bridal tulle over them to hold it all in place, and give a little winter shimmer to the scene.
What is your favorite method of construction, and why?
Tuesday, August 28, 2012
Sunday, August 26, 2012
Choosing Fabrics for Landscape Quilts
 |
| Collection of small scraps sorted by colors |
Large prints are problematic in a landscape quilt because they draw the eye to the elements in the print rather than blending into the overall composition. Conversely, solid colors are generally too flat and end up looking like a paint by number picture.
 |
| Color on color prints, best for landscape quilt |
 I rarely buy anything other than fat quarters, and I save every little scrap of fabric left from previous projects. I use these small pieces, collage style, to make elements for my quilts.
 For example, the section below is part of a river before it goes over a waterfall. This section could be one solid piece of dark blue, but it would lack some of the dimension provided by the variety of fabrics. I'm not happy with the part where the light blue triangle section near the top abruptly changes from a medium blue along a straight line. I will either thread paint over the place where the two join, or use textile paint to try to blend them better, or, most likely, pull out at least one piece of the light blue fabric and insert another darker fabric. All of these pieces are attached to a piece of nylon petticoat netting (not tulle). So this piece is now like one solid piece of fabric, but it is not difficult to snip the threads between the pieces and insert another piece or two.
I'll explain this method of working with turned edged fabrics to create landscape elements a piece at a time in a later post.
Subscribe to:
Comments (Atom)


